Desperate Housewife

I know, I know, here I go again *rolls eyes*

IMG_2009It’s been so long since I’ve been able to sit down and get my ancient laptop to actually DO SOMETHING I ask it to do (Maybe I should have been TELLING it what to do all this time instead)

All I can do is hold my hands up (again) and apologise for my absence…and maybe blame a MASSIVE percentage on rubbish technology and joint pain but I digress…

I HAVE been busy with all sorts though. From ALMOST finishing painting the kitchen (photos soon eventually I promise) to starting a new job (yay me) – or a pretty intense health scare (thankfully all clear now) to a handful of new fur-babies coming to stay with us. It’s been a roller-coaster indeed but I’m still here and I’m still smiling 🙂

For now I just wanted to say Hi and also direct your attention to the “snapshots” on the right hand side —> That WAS linked to my personal instagram – click here if you’re an Instagram(mer??) & want to follow that account – but it has now been updated to share snapshots from my BritishChick account instead so hopefully that will let all you crafty people see the relevant things I’ve been up to…. rather than selfies of me and my dog…. *rolls eyes*

I shall return! (famous last words I’m sure but this blog is always on my to-do list so the intention is still there)

I hope you are all well and happy 🙂

Categories: Desperate Housewife | Tags: , , , , , , , , | 8 Comments

Cloudy with a chance of spray paint 

I promise this blog isn’t going to be ALL about my house BUT while that’s what I’m working on I’ll share as I go-otherwise you’ll never hear from me. This time is all about my kitchen table transformation
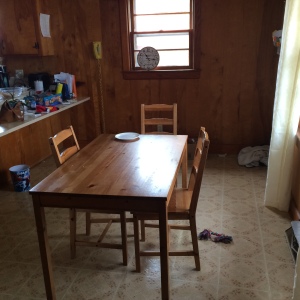
Ignore the mess....focus on the wood :)

Ignore the mess….focus on the wood 🙂

My kitchen is very… Wooden. The walls will eventually be painted cream or “off-White” (is there a difference??)  The one thing I want to keep is the black metal handles on the cabinets so with that in mind black will be the accent colour.

My husband is fed up with the dining set we have, mainly because it’s a cheap Tesco table that has been with me for years but also because I’ve used it for painting on, one chair is broken and again it’s very… Wooden.

After hunting for dining sets and hearing my bank balance scream I decided to update our set and give it a new lease of life.

*Enter my two enemies, the sander and the spray paint*

First I sanded all pieces (with the right type of paper)

Then I set to work fixing the broken chair. This bad boy has been held together with a mixture of wood glue, duct tape and sticky labels ever since my then-toddler had a tantrum and knocked it over.

This is my new favourite thing

This is my new favourite thing

I found this stuff which claims to be harder than steel… A quick dip, squeeze and wrap later and it’s stronger than it’s ever been. It can also be sanded and painted over.

I took to the garden and got going. Remembering previous mistakes I took my time, opting for a few light sprays from a distance.  Then the thunderstorms happened so I moved to the carport *note to self- check weather before starting a project*

This particular spray paint claims “no drips” but it lied!! A light (hand) rub down with ultra fine sandpaper removed any splodges and I simply sprayed over it lightly to cover.

Also it turns out the weather really does matter! Humidity+ water+ spray paint = cloudy results and/or cracking in parts, especially if rain droplets find their way onto whatever you’re spraying

After a good day letting it dry, googling cloudy-removing solutions, spending a good 30 minutes of hair-dryer action and fearing that the clear coat spray may give the same results I resorted to my backup plan – THIS stuff. A brush on paint AND sealant in one.

Moving into the house, armed with rollers, sponge brushes and plastic sheeting I lightly sanded the pieces and painted over them. I found that light coatings with drying time and light sanding in between works best. Any thick/drippy bits were easily sanded and re-coated

I'm in love :)

I’m in love 🙂

4 coats later and I’m in love. With the addition of some beige/cream chair cushions and a random place-mat with jug combo I’m really pleased with the outcome. It definitely kept me busy AND saved some money (even more so when I returned the left over spray paints)

Cushions $20

(Wasted) spray paint $14

Rollers, brushes & tray $10

Polyshades $11

Jug (gift)

Place mat $2

$57 for a new dining set

As always here are more pics to show the stress process


Categories: Desperate Housewife | Tags: , , , , , , , , | 4 Comments

Who knew stripping was so hard

The bathroom – part 1 (don’t judge me)

I made a mess of my bathroom (paint) and I’m upset with myself. I make no secret of the fact that I am NOT good at DIY – or making good choices OR being patient for that matter

Pink and brown...mmmmm

Pink and brown…mmmmm

The Problem: First off- this is what I had to work with…. typical pink (or nude) and brown (or skid mark) tiles and matching unit that was popular when it was built and decorated in the 70s (and kept that way ever since) It has lovely green carpet too(in pics below)… Luckily for us it’s just laid over original tile and easily lifted -or it will be when the time comes, it’s just a shame the tiles aren’t more appealing.

 The plan: I wanted colours which could tie in with the tile -meaning less work in the long run- but I also wanted something warm and inviting. For the main wall I chose a warm caramel it has “warm” in the name so the choice wasn’t that difficult, the tiles will be eventually cream and the accent colours for example the nice pink unit will eventually be a chocolate brown…. Easy enough right?

*my dad calls this colour “baby poo”, it looks very different on camera than real life and the reflection from the remaining pink tile isn’t helping either but trust me it WILL look nice in the end*

"Baby Poo Brown' with primed tile

“Baby Poo Brown’ with primed tile

The lessons I learned the hard way: 

  • Work from the top down: I decided to prime the pink tile as that’s that main thing that irks me (aside from the carpet) but after priming one wall I realised I should probably start at the top and work my way down. A little time wasted but no biggie
  • If the advice at Walmart is “Maybe your should go to Lowes” … Go to Lowes
  • Buying paint at Walmart purely because it’s closer and I’m lazy I happened to be there when the urge to impulse-buy paint struck wasn’t the best idea.
  • Don’t trust the “paint-finish-key”: I’m used to buying paints marked “bathroom” etc but Walmart just has flat, satin, glossy and semi-gloss The key told me semi-gloss was the way to go… It wasn’t

 What I learned about semi-gloss (this deserves its own section:

  • Unless you’re going for a very light colour or painting a large room with natural light… Stay away from semi-gloss
  • It’s going to end up darker than the picture on the tin
  • You’ll feel like you’re in a wet, dark, cave
  • Gloss paint shows up every imperfection in the wall! So either sand the wall or go for satin. Otherwise shelling out for paint “pads” which are “smoother than a roller and quicker than a brush” is completely pointless.
  • If you hate the look of the first wall… Painting the others will not make it look any better.
The sander is NOT my friend

The sander is NOT my friend

The outcome: I backed away and went to bed- when you lose sleep over something you know it’s got to change. This morning I woke up determined to repaint it with a satin finish and googled whether that was a possibility or not….it is.  A friend suggested sanding it first to remove the obvious brush strokes showing through from the previous owners so I bought a hand power-sander to help speed things up. *yes I can see you cringing*

Lessons about sanding: 

  • Using the wrong type of paper when sanding over gloss paint can remove 3 layers of paint in patches all over the place leaving the option of attempting to paint over the patches OR removing all paint from that wall with a tiny paint trowel I found in my craft drawer….

3 days (and some wine) later the wall was stripped, patched, primed and ready for round 2

I’m so much happier now it’s not as shiny, I painted over the other walls (without sanding) and it acted like a second coat, filling in any patches and calming down the cave-feel. I’ve since started on the tile – with the RIGHT kind of paint (thanks Lowes) so I’ll update you once I’ve come down from the fumes 🙂


Categories: Desperate Housewife | Tags: , , , , , , , , | 4 Comments

Anything that CAN go wrong….

We are finally in the new house! It’s been a crazy few weeks but we made it.

We moved by ourselves (only 5 minutes down the road but that doesn’t make lifting a sofa any easier) discovered an abandoned mouse nest behind the kitchen drawers -and evidence of them running all through the cupboards *shudder* and then the gas/heat ran out Sunday night. The world chose that moment to send a winter storm our way.

It's warmer in my freezer than in my house...

It’s warmer in my freezer than in my house…

We spent 4 days and nights with no school, no work and no heat; surrounded by boxes (have you ever tried unpacking wearing 7 layers of clothing??) and surviving on 2 tiny space heaters- not fun! We didn’t dare go out and play in it as the idea of getting warm again… Well it wasn’t really an option ha ha. At a few times it was actually warmer in my freezer than in our house … Again, not fun.

Just as the world started to thaw the gas man arrived and we got back in the swing of things… Until I received a phone call informing me that my husband was in hospital after slipping on ice. Worryingly he had slipped and remained on the ground for about 30 minutes face down in the grass unable to move :/ Luckily he came away with just bad bruising and very strong pain medication

BUT that means he’s been out of action for almost a week now. And of course the weather took another turn so little man has been off school too. I think it’s safe to say we’ve all got a bit of cabin fever now ha ha!

ANYWAY, despite everything I’ve managed to unpack everything and find a place for it. So far there is one room I’m completely happy with (and that’s because it’s the spare room so nothing is moved the minute I finish organising it)

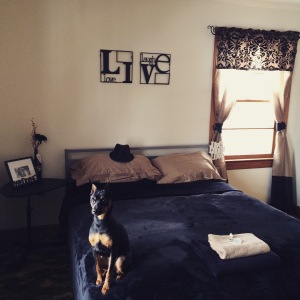
It used to be hot pink and black but this time the curtains dictated which way I should go with it, opting for a more grown up and simple look rather than Barbies brothel. – BTW choosing curtains has been such a headache AND EXPENSIVE ha ha.

Toby approves of the spare room

Toby approves of the spare room

I love it! A friend sold me a black chair to go with it – I’m thinking it will do as somewhere to drape clothes until we have the means to get some real furniture but for now that, a laptop table and a huge “closet” should work just fine 🙂

As for the carpet…. (Ha ha!) it runs the entire length of the house – including the bathrooms!!! *yuck* but it will be going as soon as the weather warms up. It’s original hardwood underneath so that will be a project in itself.

As always I’ll leave with some other pics (no before and afters as it’s only the addition of furniture lol) but hopefully I’ll be back to show you another finished room sometime soon 🙂


Categories: Desperate Housewife | Tags: , , , , , | 2 Comments

Create a free website or blog at WordPress.com.